(更新履歴)2024/12/24 画像の表示を修正、動画をXからYoutubeに変更
Input Systemとは
「Input System」は従来の入力システム(Input Manager)に代わる新しい入力システムです。
従来のInput Managerは手軽に利用できる反面、複数デバイス対応が面倒だったり管理クラスが必要になったりなど、デメリットもありました。
Input Systemではそれらの問題が解決され、より柔軟に入力を扱えるようになりました。
Input Systemのインストール
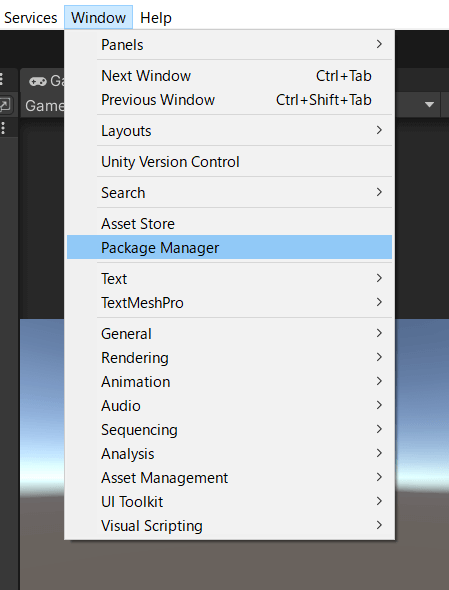
「Window > Package Manager」を開きます。
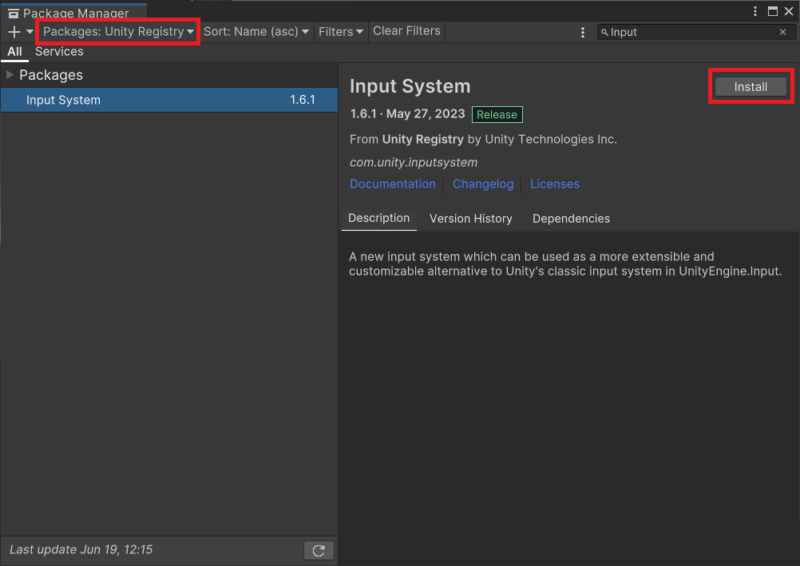
「Packages:Unity Registry」が選択されている状態で検索バーに「Input」などと入力するとInput Systemが出てくるので、選択して「Install」をクリックします。
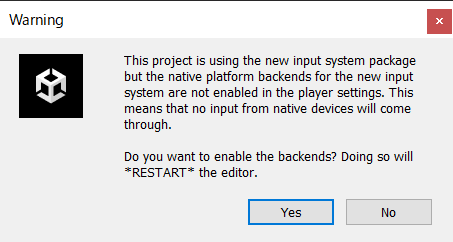
インストールすると、古いシステム(Input Manager)を無効にしてInput Systemを有効にするかを確認するウィンドウが表示されます。
「Yes」をクリックするとエディターが再起動され、Input Systemが有効になります。
NOを選択した場合、またはInput SystemとInput Managerの両方を使いたい場合は以下の手順で設定を変更できます。
「Edit> Project Settings」を開きます。
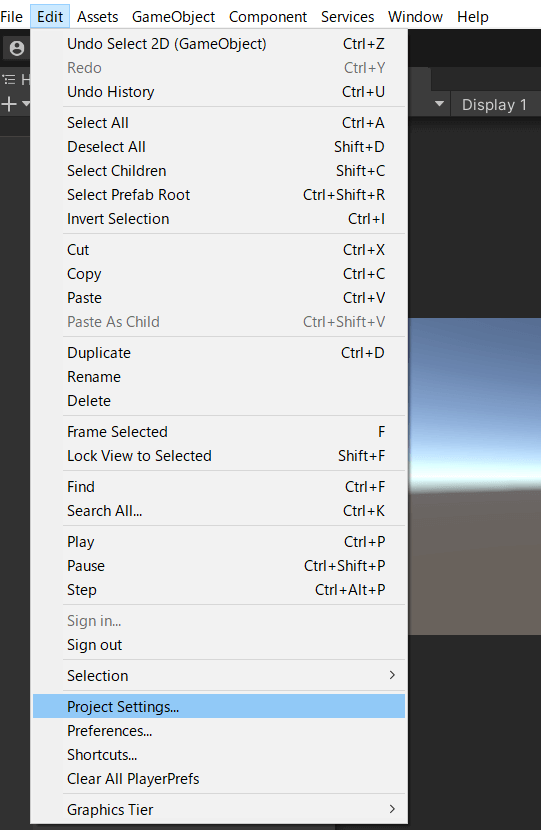
「Player > Other Settings」を開きます。
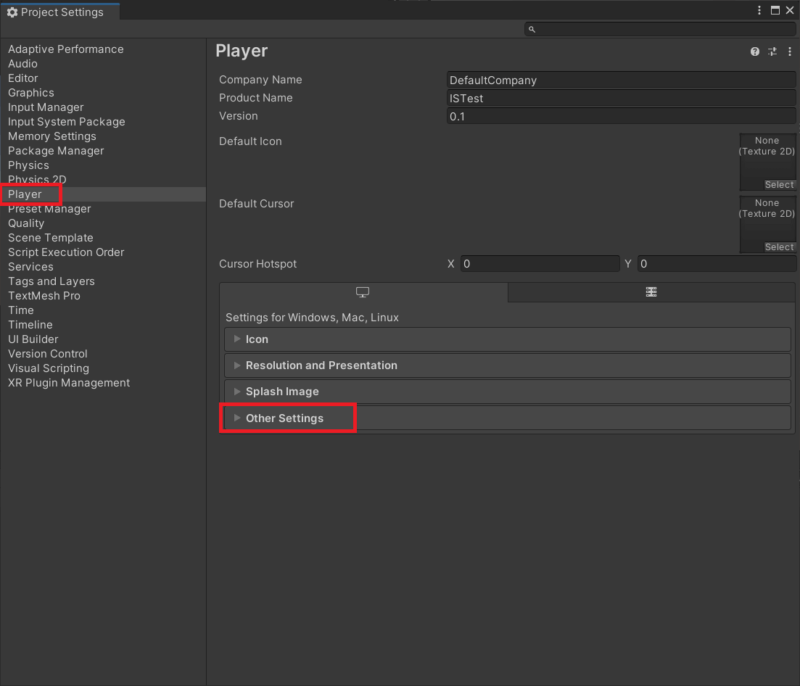
「Configuration」にある「Active Input Handling」の値を変更します。
「Both」を選択すると新旧両方のシステムを使用できます。

サンプルのインポート
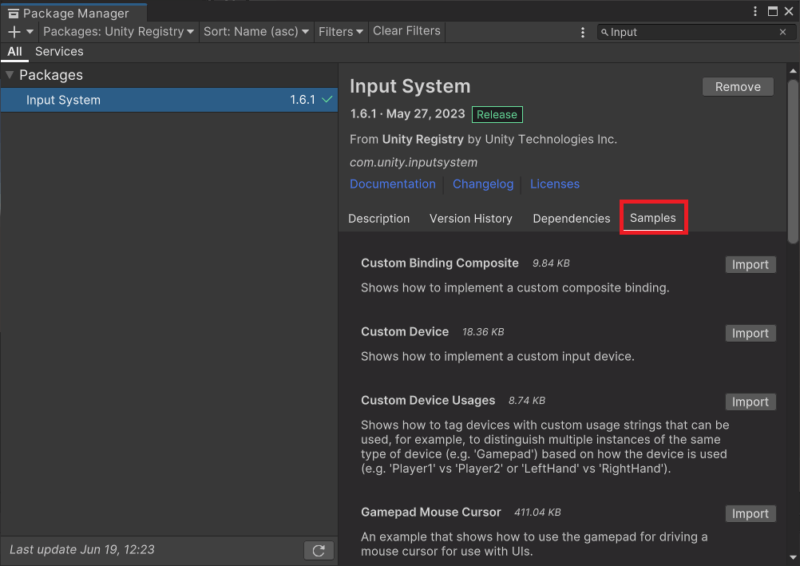
Package ManagerでInput Systemの「Samples」タブを開くと、様々なサンプルをインポートすることができます。
Input Systemの使用例
ここからは、Input Systemを使った簡単なサンプルをいくつか紹介していきます。
キーボードの入力を取得
従来の「Input.GetKeyDown」「Input.GetKeyUp」「Input.GetKey」は、Input Systemでは以下のように置き換えることができます。
using UnityEngine;
using UnityEngine.InputSystem;

public class KeyboardTest : MonoBehaviour
{
    void Update()
    {
        Keyboard current = Keyboard.current;

        // キーボード接続チェック
        if (current == null)
        {
            // キーボードが接続されていないとnull
            return;
        }

        // wasPressedThisFrame(=Input.GetKeyDown):押された瞬間
        if (current[Key.Space].wasPressedThisFrame)
        {
            Debug.Log("Spaceキーが押された");
        }

        // isPressed(=Input.GetKey):押されている間
        if (current[Key.Space].isPressed)
        {
            Debug.Log("Spaceキーが押されている");
        }

        // wasReleasedThisFrame(=Input.GetKeyUp):離された瞬間
        if (current[Key.Space].wasReleasedThisFrame)
        {
            Debug.Log("Spaceキーが離された");
        }
    }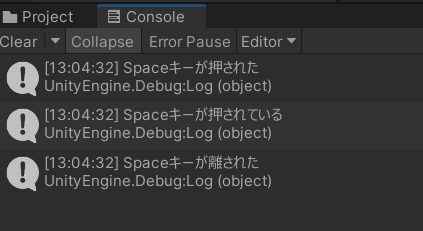
}コントローラーやマウスなどでも同じですが、途中でデバイスの接続を外されるとnullになってしまうため、nullチェックが必要になります。
以下はコンソールの出力結果です。
Actionを使用した入力
Actionを使用すると、例えばキーを割り当てることで異なるデバイスを使っても同じ動きを実装できるようになります。
Input Actionsの作成
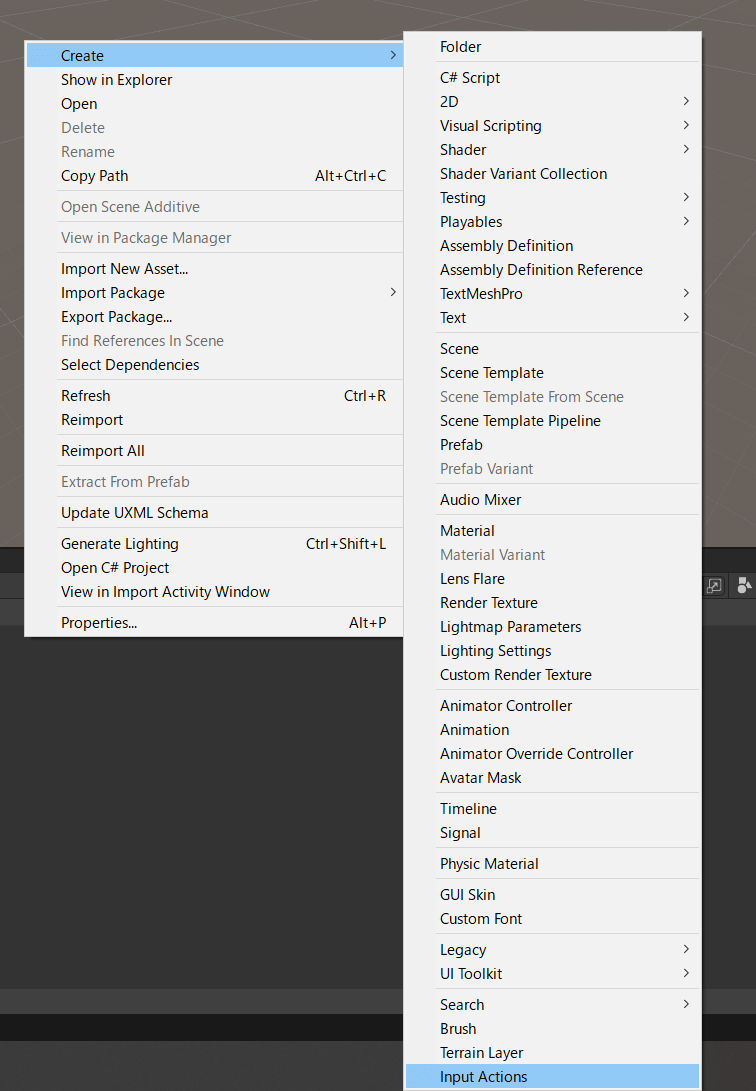
右クリックメニューから「Create > Input Actions」をクリックします。
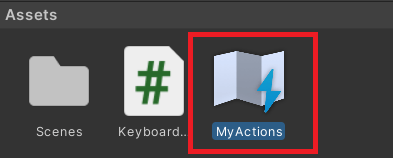
Input Actionsファイルが作成されるので名前を付けます。
ここでは「MyActions」という名前で進めます。
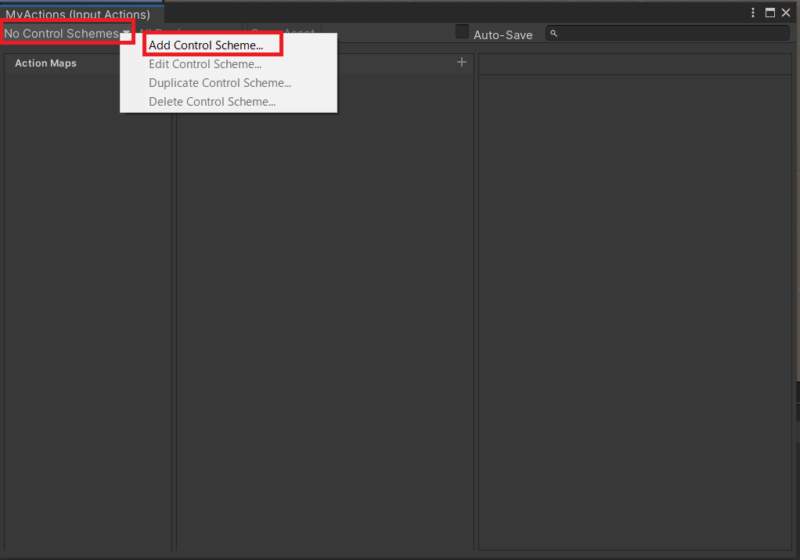
Control Schemeの追加
ダブルクリックすると編集ウィンドウが開かれます。
左上の「No Control Schemes」をクリックし、「Add Control Scheme」を選択します。
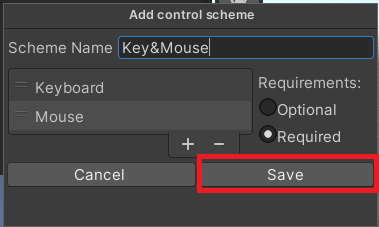
+をクリックしてリストにデバイスを追加していきます。

今回はKeyboardとMouseを選択しました。
選択が終わったら「Save」をクリックして保存します。
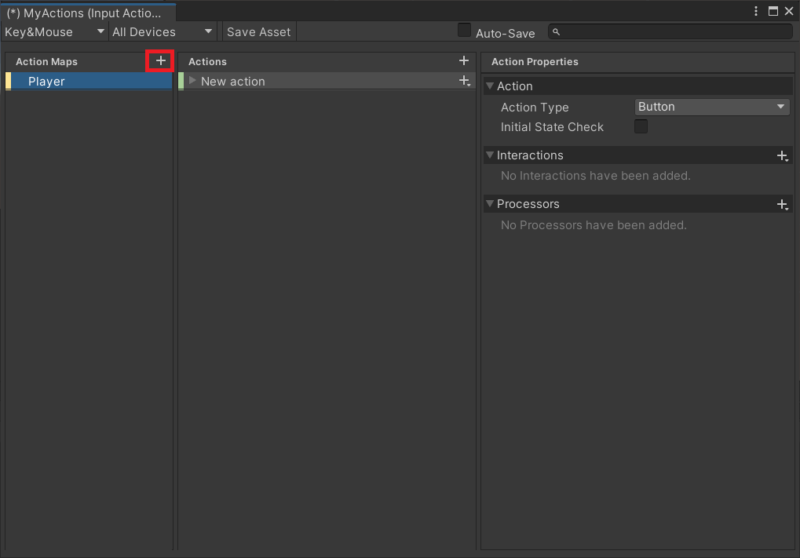
Action Mapの追加
Action Mapsの右にある+をクリックして新しいAction Mapを追加します。
今回は「Player」という名前にしました。
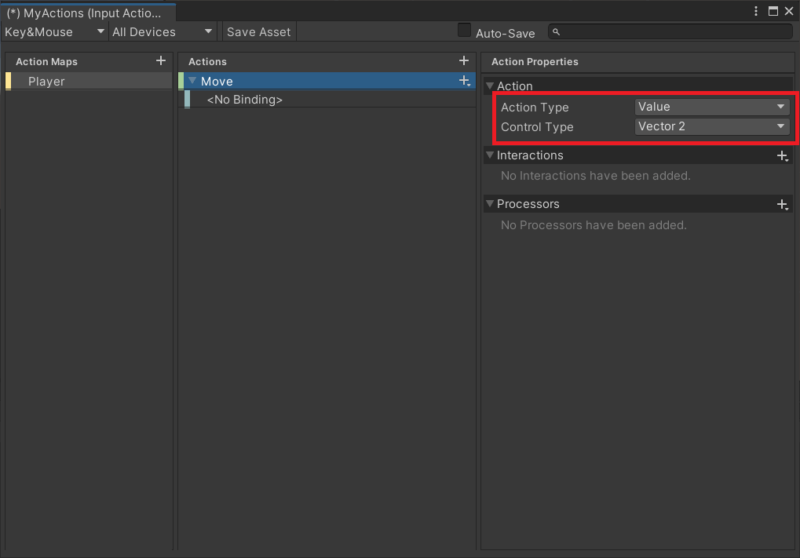
Actionを作成
次にActionsを編集していきます。
今回は、プレイヤーを移動させる「Move」というActionを作っていきます。
Actionを選択し、プロパティのAction Typeを「Value」、Control Typeを「Vector2」に変更します。
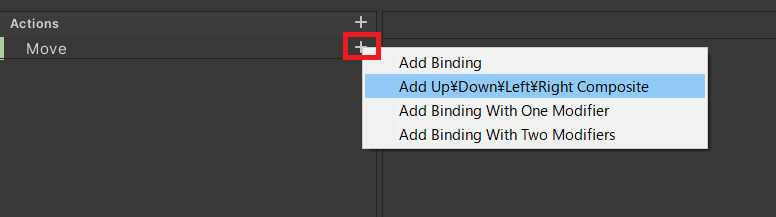
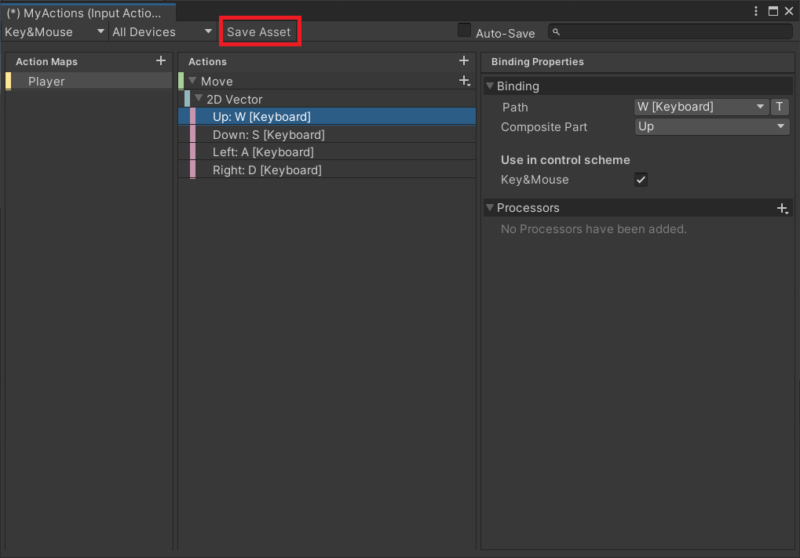
最初からあるバインドはいったん削除し、+から新しくバインドを追加します。
「Add Up\Down\Left\Right Composite」を選択します。
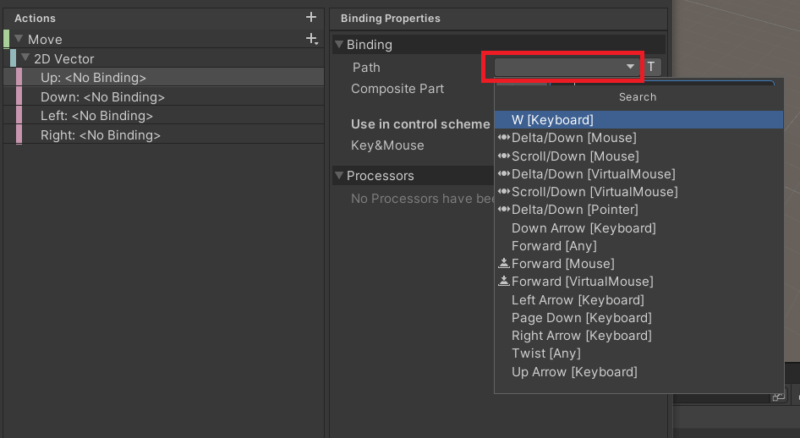
「Up」「Down」「Left」「Right」それぞれに対応するキーを設定していきます。
Pathのリストをクリックして設定したいボタンやキーを入力すると候補に出てきます。
バインド設定が終わったら「Save Asset」をクリックして保存します。
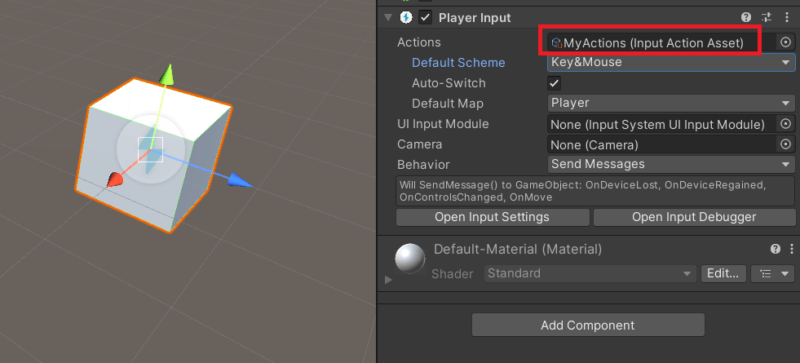
入力を取得するオブジェクトの作成
設定した入力を受け取るオブジェクトを作成し、「Player Input」コンポーネントを追加します。
Actionsには先ほど作成したInput Actionを指定します。
新しいスクリプトを作成し、オブジェクトにアタッチします。
スクリプトには以下のコードを記述します。
using UnityEngine;
using UnityEngine.InputSystem;

public class InputController : MonoBehaviour
{
    PlayerInput playerInput;
    InputAction move;
    float speed = 10.0f;

    void Start()
    {
        playerInput = GetComponent<PlayerInput>();
        // 「Move」という名前のアクションを取得
        move = playerInput.currentActionMap.FindAction("Move");
    }

    void Update()
    {
        Vector2 pos = transform.position;
        pos += move.ReadValue<Vector2>() * Time.deltaTime * speed;
        transform.position = pos;
    }
}
実行してバインドしたWASDキーを入力してみると、オブジェクトが移動することが確認できます。
さいごに
Input Systemはこれからよく使っていくことになるので、自分用のメモも兼ねて紹介しました。
実装方法は色々あるので、色々試して自分のやりやすい方法を探してみてください。
従来のInput Managerよりも便利ですが実装が少し複雑になった部分もあるので、使いながらコツコツ覚えていこうと思います。
コメント